overhead door legacy 850 manual

Overhead Door Legacy 850 Manual: A Comprehensive Guide

This manual details the Legacy 850 opener, covering installation, programming, operation, and maintenance․ It includes CodeDodger remote and Safe-T-Beam system details, ensuring safe and efficient garage door functionality․

The Overhead Door Legacy 850 is a robust and reliable garage door opener designed for both residential and light commercial applications; This manual provides comprehensive guidance for owners and installers, covering everything from initial setup to troubleshooting common issues․ It’s compatible with Homelink and Car2U systems, offering seamless integration with modern vehicles․

The Legacy 850 features CodeDodger technology for enhanced security and a Safe-T-Beam system for obstruction detection, prioritizing safety during operation․ Proper installation and adherence to safety guidelines, as outlined within, are crucial for optimal performance and longevity․

Understanding Overhead Door Systems

Garage door systems comprise several key components: the door itself, tracks, springs, rollers, and the opener unit – the Legacy 850 in this case․ The opener translates electrical power into mechanical force, raising and lowering the door․ Understanding how these parts interact is vital for safe and effective maintenance․

Overhead costs, distinct from direct material and labor, encompass expenses like electricity and facility upkeep․ The Legacy 850’s efficiency minimizes energy consumption, reducing these overhead expenses․ Proper system balance and lubrication contribute to smooth operation and extended component life․

Safety Precautions

Prior to installing or servicing the Legacy 850, disconnect power to prevent electrical shock․ The Safe-T-Beam system is crucial; ensure it’s correctly installed and functioning, preventing the door from closing on obstructions․ Never allow children to operate the door or play near it․

Regularly inspect springs, cables, and mounting hardware for wear and tear․ Refer to the manual for detailed safety guidelines․ Improper installation or maintenance can lead to serious injury․ Always consult a qualified technician for complex repairs․

General Safety Guidelines

Always keep people and objects clear of the door’s path during operation․ Never bypass or disable safety features like the Safe-T-Beam․ Conduct monthly tests of the reversing mechanism to confirm proper function․ Ensure the door is balanced; a struggling door indicates a problem needing immediate attention․

Do not attempt repairs beyond your skill level; seek professional assistance․ Familiarize yourself with the emergency release mechanism for manual operation․ Keep the area around the door clear and well-lit․ Refer to the complete manual for comprehensive safety information․

Safe-T-Beam System Operation

The Safe-T-Beam system utilizes an invisible infrared beam across the door opening․ If an obstruction breaks the beam while the door is closing, the door will immediately stop and reverse․ Proper alignment is crucial; ensure lenses are clean and pointed at each other․

Verify the indicator light is solid, signifying functionality․ A flashing light indicates misalignment or obstruction․ Do not bypass this safety feature․ Refer to the manual for detailed troubleshooting and alignment instructions to maintain safe operation of your Legacy 850․

Legacy 850 Components

The Legacy 850 system comprises several key components․ These include the door opener unit itself, housing the motor and control board․ A CodeDodger remote control system provides secure access․ Robust track and hardware ensure smooth door movement․ The Safe-T-Beam system enhances safety by preventing the door from closing on obstructions․

Understanding each component’s function is vital for proper installation, maintenance, and troubleshooting․ Refer to the detailed diagrams within this manual for specific part identification and assembly instructions related to your Legacy 850․
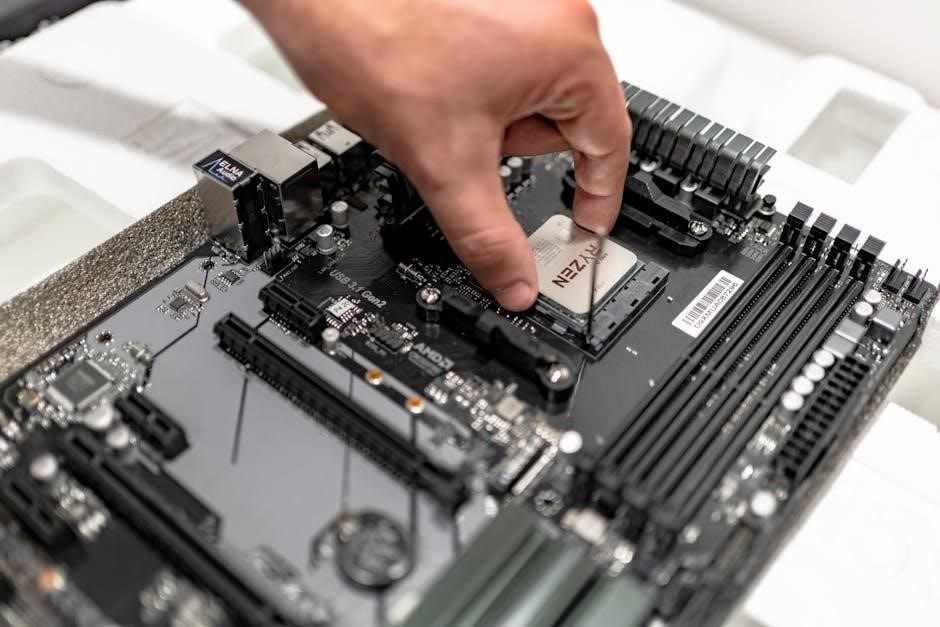
Door Opener Unit

The Legacy 850’s opener unit houses the powerful motor responsible for lifting and lowering the garage door․ It includes the control board, managing operation and safety features like the Safe-T-Beam system․ Proper mounting, as detailed in the installation section, is crucial for stable performance․

This unit is pre-programmed for basic functionality but requires remote control programming for convenient use․ Always disconnect power before servicing the opener unit to prevent electrical shock․ Refer to the technical specifications for motor details․

Remote Control System (CodeDodger)

The Legacy 850 utilizes the CodeDodger remote control system for secure and convenient door operation․ This system offers rolling code technology, enhancing security against unauthorized access․ Initial programming is straightforward, as outlined in the programming section of this manual․

CodeDodger is also compatible with HomeLink systems found in many vehicles․ Battery replacement is simple, ensuring continuous operation․ Refer to the dedicated CodeDodger section for detailed programming and troubleshooting information․

Track and Hardware

The Legacy 850’s track and hardware system is designed for durability and smooth operation․ Proper alignment is crucial for optimal performance and safety․ Regularly inspect the tracks for obstructions or damage, ensuring free movement of the door․

Hardware components should be securely fastened, and any loose parts tightened immediately․ Lubrication, as detailed in the maintenance schedule, minimizes friction and extends the lifespan of the system․ Consistent checks prevent potential issues and maintain reliable functionality․

Installation Instructions

Installation of the Legacy 850 requires careful adherence to these instructions for safe and effective operation․ Begin by ensuring the door is balanced and moves freely․ Securely mount the opener unit, following the provided diagrams, and connect the door arm, verifying proper alignment․

Always disconnect power before commencing any electrical connections․ Double-check all hardware is tightened, and the Safe-T-Beam system is correctly installed before proceeding to programming․ Refer to the detailed diagrams within this manual․

Mounting the Opener Unit

Securely mount the Legacy 850 opener unit to ceiling joists or a properly reinforced header, ensuring adequate clearance․ Utilize the provided mounting brackets and hardware, verifying they are firmly attached to solid structural members․

Confirm the unit is level and positioned to allow for smooth door travel․ Double-check all bolts are tightened to the manufacturer’s specifications․ Proper mounting is crucial for stable operation and minimizes vibration during use, as detailed in this manual․

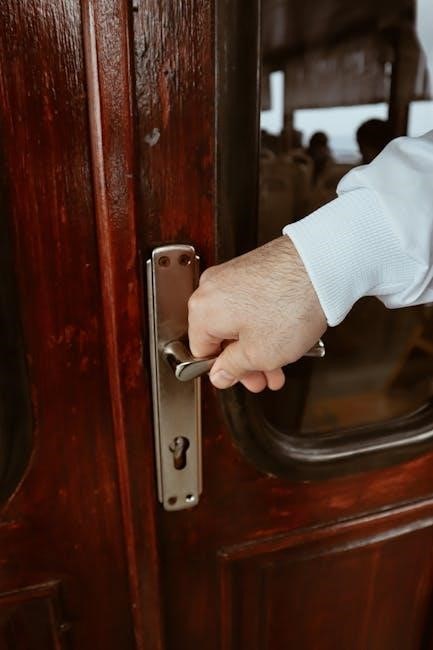
Connecting the Door Arm

Attach the door arm to both the Legacy 850 opener unit and the door itself, ensuring a secure connection using the supplied hardware․ Adjust the arm’s length to achieve the correct door travel arc, referencing the diagrams within this manual for optimal positioning․

Verify the arm moves freely without obstruction and that all connections are tight․ Proper arm connection is vital for efficient and safe door operation, preventing strain on the opener and ensuring smooth movement throughout its cycle․

Programming the Remote Control

The Legacy 850 utilizes the CodeDodger system for remote control programming․ Begin by accessing the learn mode on the opener unit, typically by pressing the ‘PRGM’ button․ Then, activate the desired remote control button, allowing the opener to recognize its unique code․

Confirm successful programming by testing the remote’s functionality․ Refer to the manual for Homelink compatibility instructions, ensuring seamless integration with vehicle systems․ Factory-programmed remotes offer initial convenience, but may require reprogramming․

Initial Programming

Upon initial setup of your Legacy 850, the remote control arrives factory-programmed for ease of use․ However, it’s recommended to reprogram for enhanced security․ Access the opener’s learn mode by pressing the ‘PRGM’ button until the indicator light illuminates․

Press and hold the desired button on the remote until the opener responds, confirming successful programming․ This process establishes a unique code between the remote and the door opener, preventing unauthorized access․ Consult the full manual for detailed steps․

Homelink Compatibility

The Legacy 850 is designed for seamless integration with HomeLink systems found in many vehicles․ Refer to your vehicle’s owner’s manual for specific HomeLink programming instructions; Typically, this involves pressing and holding the HomeLink button while simultaneously pressing the programmed button on your Overhead Door remote․

If programming fails, try clearing the HomeLink memory first․ Visit OverheadDoor․com for detailed guidance and troubleshooting steps to ensure successful HomeLink compatibility with your Legacy 850 opener․

Operation Instructions

The Legacy 850 operates via the wall control, remote control (CodeDodger), or compatible in-car systems like HomeLink․ To operate, simply press the corresponding button․ The Safe-T-Beam system ensures the door reverses if an obstruction is detected․ Always ensure the safety beam is properly aligned and functioning․

For manual operation during power outages, use the emergency release cord․ Remember to disengage the opener before attempting manual operation and re-engage it afterward for normal functionality․

Normal Door Operation

With the Legacy 850, pressing the wall control or remote button initiates the door’s movement․ The door will travel its full range unless obstructed by the Safe-T-Beam system․ Observe the door during operation to confirm smooth movement and proper reversal if an obstacle is present․

Ensure no one is in the path of the door during operation․ Regular checks of the Safe-T-Beam are crucial for continued safe operation․ Avoid attempting to override the safety features․

Using the Wall Control

The wall control provides a convenient method for operating your Legacy 850 garage door․ A single press of the button activates the door’s movement – either opening or closing, depending on its current position․ Ensure the area is clear before operation․

If the door reverses unexpectedly, check for obstructions or Safe-T-Beam issues․ The wall control serves as a reliable backup to the remote control system, offering consistent performance․

Maintenance Schedule

Regular maintenance ensures the longevity and smooth operation of your Legacy 850․ Conduct monthly inspections of the door, tracks, and hardware for any signs of wear or damage․ Lubricate moving parts – rollers, hinges, and the door arm – every six months with a silicone-based lubricant․

Inspect the Safe-T-Beam system for proper alignment and functionality․ A consistent schedule prevents costly repairs and maintains safety features․

Regular Inspections

Monthly visual inspections are crucial for identifying potential issues early․ Examine the door sections for dents, rust, or separation․ Check the tracks for obstructions, bends, or loose mounting brackets․ Inspect the springs for signs of fatigue or damage – do not attempt to adjust them yourself!

Verify the Safe-T-Beam sensors are clean and aligned․ Ensure all bolts and fasteners remain tight․ Consistent inspections contribute to safe and reliable operation of your Legacy 850․

Lubrication Procedures

Apply a lithium-based grease to the door’s hinges, rollers, and track sections every six months․ Avoid using oil-based lubricants, as they attract dirt․ Ensure the grease is evenly distributed for smooth operation․ Inspect the opener’s chain or belt and apply lubricant as needed, following manufacturer recommendations․

Never lubricate the Safe-T-Beam sensors or the motor unit itself․ Proper lubrication minimizes friction, reduces wear, and extends the lifespan of your Legacy 850 system․

Troubleshooting Common Issues

If the door isn’t responding, check the power supply, Safe-T-Beam alignment, and wall control batteries․ For remote control problems, verify battery function and reprogram if necessary․ Ensure no obstructions interfere with the sensors․ A flashing light often indicates a safety sensor issue․

Consult the manual for specific error codes․ If issues persist, contact Overhead Door customer support for assistance․ Regular maintenance can prevent many common problems with your Legacy 850․

Door Not Responding

If your Legacy 850 door fails to operate, first verify the power supply to the opener unit․ Check the circuit breaker and ensure the outlet is functioning correctly․ Next, inspect the Safe-T-Beam sensors for obstructions or misalignment – a flashing light indicates this․ Confirm the wall control has fresh batteries and isn’t damaged․

Review the manual for specific troubleshooting steps related to a non-responsive door․ If problems continue, professional assistance may be required․

Remote Control Problems

If your CodeDodger remote isn’t working, begin by replacing the battery․ Ensure the remote is programmed correctly to the Legacy 850 opener – refer to the programming section of this manual․ Check for interference from other devices․ If multiple remotes aren’t functioning, the receiver in the opener unit might be the issue․

Verify Homelink compatibility if using that system, consulting both the vehicle and Overhead Door documentation for proper setup․ Resetting the remote may also resolve connectivity issues․

Understanding Overhead Costs (Related Concept)

In business, overhead costs are essential expenses not directly tied to production, like rent, utilities, and administrative salaries․ Fixed overhead costs remain constant regardless of output, while variable overhead costs fluctuate with production levels․ Understanding these costs is crucial for pricing and profitability analysis․

Though unrelated to the Legacy 850’s function, recognizing overhead principles aids in broader business management, impacting decisions about service pricing and operational efficiency․

Fixed Overhead Costs

Fixed overhead costs represent expenses that remain consistent regardless of production volume or sales․ Examples include property rent for a service facility, insurance premiums, and administrative staff salaries․ These costs are incurred even if no garage door openers, like the Legacy 850, are sold or installed․

Accurately identifying fixed costs is vital for break-even analysis and long-term financial planning within a business, impacting overall profitability assessments․

Variable Overhead Costs

Variable overhead costs fluctuate directly with the production level of Legacy 850 openers․ These include expenses like electricity used during manufacturing, indirect labor tied to production volume, and supplies consumed during installation or repair services․ As more openers are produced, these costs increase proportionally․

Managing variable overhead is crucial for controlling production costs and maximizing profit margins, impacting the final price of the door opener․

Legacy 850 Technical Specifications

The Legacy 850 boasts robust performance features․ Motor specifications include a powerful drive designed for reliable operation․ Power requirements are standard 120V AC, ensuring compatibility with typical residential electrical systems․ This opener is engineered for durability and smooth, quiet operation․

Detailed specifications are vital for proper installation and troubleshooting, guaranteeing optimal functionality of your Overhead Door system․ Refer to the full manual for precise values․

Motor Specifications

The Legacy 850 utilizes a ½ HP motor, delivering substantial lifting power for various door sizes and weights․ It features a capacitor-start, capacitor-run design, enhancing starting torque and efficiency․ The motor operates on a single-phase 120V AC power supply, common in residential settings․

These specifications ensure reliable performance and longevity․ Detailed motor characteristics, including RPM and thermal overload protection details, are available within the complete manual for advanced users․

Power Requirements

The Overhead Door Legacy 850 requires a standard 120V AC, 60Hz electrical supply․ A dedicated 15-amp circuit is recommended for optimal performance and to prevent overloading․ Proper grounding is crucial for safety, adhering to local electrical codes․

The opener consumes approximately 2 amps during operation․ Consult a qualified electrician for installation and to ensure compatibility with your home’s electrical system․ Detailed wiring diagrams are included in the full manual․

CodeDodger Remote Control Details

The Legacy 850 utilizes the CodeDodger remote system for secure access․ This system employs rolling code technology, changing the access code with each use, preventing unauthorized entry․ Initial programming is straightforward, detailed in the manual․

CodeDodger remotes are compatible with many vehicles via HomeLink․ Battery replacement is simple, requiring standard alkaline batteries․ Refer to the manual for specific programming steps and troubleshooting tips related to the remote control functionality․

Remote Control Programming

CodeDodger remote programming involves a simple sequence detailed within the Legacy 850’s manual․ Pressing the ‘PRGM’ button on the opener initiates the learning process․ Subsequently, pressing the desired button on the remote transmits the unique code․ Successful programming is indicated by the opener’s light․

For older CodeDodger remotes, consult the manual for specific instructions․ Ensure the remote is within range during programming․ Refer to your vehicle’s manual or OverheadDoor․com for HomeLink compatibility guidance․

Battery Replacement

Maintaining your CodeDodger remote requires periodic battery replacement to ensure reliable operation of your Legacy 850 system․ Consult the manual for the correct battery type․ Carefully open the remote casing, typically with a small screwdriver, and replace the old battery with a new one, observing correct polarity․

After replacement, test the remote’s functionality․ A weak battery can cause intermittent operation or complete failure․ Proper battery maintenance extends the life of your remote control system, avoiding operational disruptions․

Factory Programming Information

The Legacy 850 opener arrives with a factory-programmed remote control for immediate use․ This initial programming facilitates a quick setup process, allowing users to operate the door without immediate customization․ However, to enhance security and prevent interference, reprogramming the remote is highly recommended․

Refer to the manual for detailed instructions on clearing existing codes and adding new ones․ Understanding factory settings is crucial for customizing your system and ensuring optimal performance with HomeLink or Car2U systems․

Accessing Additional Resources

For comprehensive support beyond this manual, visit the official Overhead Door website at www․OverheadDoor․com․ There, you’ll find frequently asked questions, detailed diagrams, and potentially updated software or firmware․ Should you require direct assistance, Customer Support contact information is readily available on their website․

Furthermore, consult your vehicle’s manual for specific HomeLink programming guidance․ These resources ensure you can maximize the functionality of your Legacy 850 system and resolve any operational challenges․

Overhead Door Website

The official Overhead Door website, located at www․OverheadDoor․com, serves as a central hub for Legacy 850 resources․ Users can access detailed product information, downloadable manuals – including this one – and troubleshooting guides․ The site also features FAQs addressing common issues and provides contact details for Customer Support․

Additionally, explore sections dedicated to HomeLink compatibility and programming instructions, ensuring seamless integration with your vehicle․ Regularly check for updates and new resources related to your Legacy 850 opener․

Customer Support Contact Information

For direct assistance with your Legacy 850, contact Overhead Door’s dedicated support team․ While specific contact details vary, the official website, www․OverheadDoor․com, provides the most current information․ Expect options for phone support, email inquiries, and potentially live chat assistance․

When contacting support, have your model number (Legacy 850) readily available, along with a detailed description of the issue․ Referencing the manual can expedite the troubleshooting process and ensure a swift resolution to your concerns․

Understanding the Ribbon Logo

The distinctive Overhead Door Ribbon logo represents a longstanding commitment to quality and innovation in the garage door industry․ Introduced many years ago, it signifies the company’s dedication to providing reliable and durable products, including the Legacy 850 opener․

This logo isn’t merely a branding element; it’s a visual assurance of Overhead Door’s expertise and a promise of dependable performance․ Seeing the Ribbon logo on your Legacy 850 confirms its authenticity and adherence to high manufacturing standards․

Compatibility with Car2U Systems

The Overhead Door Legacy 850 is designed for seamless integration with various in-vehicle systems, including Car2U technology․ This compatibility allows users to control their garage door directly from their vehicle’s dashboard, enhancing convenience and security․

Refer to your vehicle’s owner’s manual for specific Car2U programming instructions․ The Legacy 850’s CodeDodger system facilitates easy pairing, offering a streamlined experience․ Ensure proper setup following both the door opener and vehicle guidelines․

Interpreting the Instruction Manual

This Legacy 850 manual provides crucial instructions for safe installation, operation, and maintenance․ Pay close attention to safety warnings and diagrams before proceeding with any steps․ Understanding the CodeDodger remote programming section is vital for secure access․

The manual details the Safe-T-Beam system’s function, ensuring door reversal upon obstruction․ Refer to troubleshooting guides for common issues․ Familiarize yourself with technical specifications for informed maintenance and potential repairs, maximizing the opener’s lifespan․

Datafile Overhead in MySQL (Related Concept)

Similar to the Legacy 850’s system complexity adding operational ‘overhead’, MySQL databases experience datafile overhead․ This occurs because MySQL doesn’t compact datafiles after deletions or updates, leading to wasted space and slower table scans․

Just as efficient maintenance optimizes the door opener, database optimization reduces this overhead․ Understanding this concept highlights how systems, even seemingly unrelated ones, share principles of efficiency and resource management, impacting overall performance․

Sunk Costs and Decision Making (Related Concept)

Like investing in a Legacy 850 system – a past expenditure – ‘sunk costs’ represent prior investments irrelevant to future decisions․ Whether repairing or replacing the opener, the initial cost shouldn’t dictate the choice․

Focusing solely on future benefits, like reliability or features, mirrors sound business judgment․ Ignoring sunk costs ensures rational decisions, prioritizing optimal outcomes rather than being anchored by past spending, much like evaluating current door operation needs․

strength training anatomy 4th edition pdf

Strength Training Anatomy 4th Edition PDF: Article Plan

This article details a plan exploring the 4th edition PDF, covering its features, download options, and applications beyond exercise, based on available resources.

Strength Training Anatomy, penned by Frédéric Delavier, has become a cornerstone resource for fitness enthusiasts and professionals alike. This comprehensive guide transcends typical workout manuals, delving deep into the anatomical aspects of resistance training. The book’s enduring popularity, evidenced by over 450,000 copies sold, stems from its unique approach – visually demonstrating how muscles function during various exercises.

The 4th edition PDF builds upon this foundation, offering an updated and expanded exploration of muscle groups and movement mechanics. It’s more than just a collection of exercises; it’s a detailed anatomical study presented in an accessible format. Understanding the underlying anatomy is crucial for maximizing training effectiveness and minimizing injury risk, making this resource invaluable.

What is Strength Training Anatomy?

Strength Training Anatomy is a highly detailed guide that visually dissects exercises to reveal the precise muscle activation during each movement. Unlike conventional fitness books, it doesn’t simply list exercises; it shows you what’s happening beneath the skin. Frédéric Delavier’s work meticulously illustrates muscle groups, their attachments, and how they contribute to specific lifts.

The 4th edition PDF continues this tradition, offering a comprehensive resource for understanding the biomechanics of strength training. It’s essentially a visual textbook, bridging the gap between theoretical knowledge and practical application. It’s designed for anyone seeking a deeper understanding of how their body responds to resistance, from beginners to experienced lifters.

The Importance of Understanding Muscle Anatomy for Training

Understanding muscle anatomy is crucial for optimizing training effectiveness and minimizing injury risk. Knowing which muscles are targeted by each exercise allows for focused training, addressing weaknesses and imbalances. Strength Training Anatomy 4th Edition PDF provides the visual tools to achieve this understanding.

Without anatomical knowledge, training can become haphazard, potentially leading to plateaus or overuse injuries. Delavier’s work empowers individuals to refine their form, ensuring proper muscle engagement. This detailed approach allows for a more intelligent and personalized training program, maximizing results and promoting long-term physical well-being. It’s about working with your body, not against it.

Overview of the 4th Edition Updates

The 4th Edition of Strength Training Anatomy builds upon its established foundation with significant enhancements. While details are emerging, updates likely include refined illustrations and expanded muscle coverage, reflecting the latest research in biomechanics and exercise science. Expect a deeper dive into movement mechanics and a more comprehensive approach to injury prevention.

The PDF format allows for easy access and portability, making the wealth of information readily available. Users can anticipate improved troubleshooting sections, addressing common form errors and muscle imbalances. This edition aims to be the definitive guide for both fitness professionals and enthusiasts seeking a detailed understanding of the human body during exercise.

Key Features of the 4th Edition PDF

The Strength Training Anatomy 4th Edition PDF boasts several key features enhancing its utility. Foremost is the detailed muscle-by-muscle analysis, providing a comprehensive understanding of function during various exercises. Enhanced visualizations and illustrations are central, offering clear depictions of muscle activation.

The PDF format enables convenient searching and zooming for detailed study. A crucial aspect is the troubleshooting section, addressing common exercise issues and form errors. Expect in-depth coverage of muscle groups, alongside practical exercise demonstrations. This edition, with over 450,000 copies sold previously, continues to be a vital resource for optimizing training and preventing injuries.

Enhanced Visualizations and Illustrations

A hallmark of Strength Training Anatomy 4th Edition is its commitment to visual learning. The PDF is replete with detailed anatomical illustrations, showcasing muscle origins, insertions, and actions with exceptional clarity. These aren’t simply static images; they dynamically depict muscle engagement during specific exercises.

The enhanced visualizations aid in understanding movement mechanics and identifying proper form. Expect layered muscle diagrams, allowing users to visualize deep and superficial muscle interactions. These illustrations, a core component of the book’s success, are instrumental in bridging the gap between anatomical knowledge and practical application, improving training effectiveness and reducing injury risk.

Detailed Muscle-by-Muscle Analysis

Strength Training Anatomy 4th Edition PDF provides an in-depth exploration of individual muscles and muscle groups. Each muscle receives a dedicated analysis, outlining its function, biomechanics, and role in various exercises. This granular approach extends beyond simple identification, detailing fiber orientation and leverage points.

The PDF dissects how each muscle contributes to specific movements, offering a comprehensive understanding of exercise execution. This detailed breakdown isn’t limited to major muscle groups; even smaller, often-overlooked muscles receive attention; This meticulous analysis empowers users to optimize their training, target specific muscles effectively, and address potential imbalances.

Exercise Demonstrations and Form Guidance

The Strength Training Anatomy 4th Edition PDF excels in providing clear exercise demonstrations coupled with crucial form guidance. It doesn’t simply list exercises; it visually breaks down each movement, showcasing proper technique. This is achieved through detailed illustrations and, potentially, accompanying photographic guides (depending on the PDF version).

Beyond visual aids, the PDF offers specific cues to ensure correct form, minimizing injury risk and maximizing effectiveness. It highlights common errors and provides corrective strategies. This focus on technique is paramount, transforming the PDF from a simple exercise catalog into a practical training resource. Users benefit from a deeper understanding of how to perform exercises, not just which ones.

Muscle Groups Covered in Detail

The Strength Training Anatomy 4th Edition PDF provides an exceptionally detailed analysis of major muscle groups, forming the core of its instructional value. Key areas include comprehensive coverage of chest and shoulder exercises, dissecting the muscles involved in pressing, lifting, and rotational movements. Similarly, back and lat exercises receive in-depth attention, illustrating how to build a strong and defined back.

The PDF doesn’t stop there; leg and glute exercises are thoroughly explored, alongside a dedicated section for arm and core exercises. Each muscle group is presented with anatomical illustrations, exercise variations, and explanations of biomechanics, allowing users to understand precisely which muscles are targeted during each movement.

Chest and Shoulder Exercises

The Strength Training Anatomy 4th Edition PDF meticulously breaks down chest and shoulder exercises, showcasing the intricate muscle interactions during each lift. It details exercises like bench presses, flyes, and push-ups, illustrating the roles of the pectoralis major, minor, and anterior deltoids. For shoulders, the PDF covers presses, raises, and rotations, highlighting the involvement of the medial and posterior deltoids.

Detailed anatomical illustrations pinpoint muscle activation, aiding in proper form and maximizing effectiveness. The guide explains how variations in grip and angle impact muscle recruitment, offering a nuanced understanding of exercise mechanics. This section is crucial for building a well-rounded upper body, preventing imbalances, and optimizing training results.

Back and Lat Exercises

The Strength Training Anatomy 4th Edition PDF provides an in-depth analysis of back and lat exercises, crucial for building a strong and balanced physique. It dissects movements like pull-ups, rows, and lat pulldowns, clearly illustrating the activation of the latissimus dorsi, trapezius, rhomboids, and erector spinae.

Detailed visuals demonstrate how different variations – grip width, hand position – alter muscle emphasis. The PDF emphasizes proper form to prevent injury and maximize muscle engagement. Understanding these anatomical details allows for targeted training, addressing weaknesses and improving posture. This section is invaluable for anyone seeking to develop a powerful and aesthetically pleasing back, enhancing overall athletic performance.

Leg and Glute Exercises

The Strength Training Anatomy 4th Edition PDF offers a comprehensive breakdown of leg and glute exercises, essential for power, athleticism, and overall body strength. It meticulously details movements like squats, lunges, deadlifts, and hamstring curls, showcasing the activation of the quadriceps, hamstrings, gluteus maximus, and calves.

High-quality illustrations reveal muscle involvement during each phase of the exercise, highlighting the importance of proper technique. The PDF explains how subtle adjustments – stance width, depth – can shift the focus to different muscle groups. This knowledge empowers users to design effective training programs, targeting specific areas for optimal development and injury prevention, ultimately improving functional movement.

Arm and Core Exercises

The Strength Training Anatomy 4th Edition PDF provides detailed analysis of arm and core exercises, crucial for functional strength and stability. It dissects movements like bicep curls, triceps extensions, shoulder presses, and various core exercises – planks, crunches, and rotations – illustrating precise muscle activation.

The PDF’s visualizations clearly demonstrate how different variations impact muscle engagement in the biceps, triceps, deltoids, and abdominal muscles. It emphasizes the interconnectedness of core stability with upper body power, explaining how a strong core enhances performance in arm exercises. Users gain insights to optimize form, prevent injuries, and build well-rounded strength, improving athletic capabilities and daily life movements.

Troubleshooting Common Exercise Issues

A vital component of Strength Training Anatomy 4th Edition is its comprehensive troubleshooting section, serving as a critical resource when users encounter difficulties. The PDF addresses frequent form errors across various exercises, offering clear visual guidance to correct them.

It identifies common issues like rounded backs during squats, improper elbow positioning in bench presses, and incorrect core engagement in planks. The guide doesn’t just point out errors; it explains why they occur and provides targeted cues for improvement. This section is invaluable for preventing injuries and maximizing exercise effectiveness, ensuring users perform movements safely and efficiently, ultimately enhancing their training results.

Identifying Form Errors

Strength Training Anatomy 4th Edition PDF excels in visually demonstrating correct and incorrect exercise forms. The book utilizes detailed illustrations to pinpoint common mistakes, such as improper spinal alignment during deadlifts or insufficient range of motion in lunges.

These visual cues are paired with concise explanations, detailing the biomechanical consequences of each error. The PDF highlights how flawed form can lead to muscle imbalances, reduced effectiveness, and increased injury risk. By clearly showcasing these errors, the guide empowers users to self-assess their technique and proactively correct deviations, fostering safer and more productive workouts. This focus on form is central to the book’s value.

Preventing Injuries

Strength Training Anatomy 4th Edition PDF prioritizes injury prevention through a deep understanding of muscle function and biomechanics. The guide doesn’t just show exercises; it explains why certain movements are performed correctly, emphasizing the role of stabilizers and synergists.

By illustrating potential stress points and common injury mechanisms, the PDF equips users to modify exercises based on individual limitations. It stresses the importance of proper warm-up routines and progressive overload, minimizing the risk of strains and sprains. The detailed muscle analysis allows for targeted strengthening of vulnerable areas, promoting joint stability and overall resilience.

Addressing Muscle Imbalances

The Strength Training Anatomy 4th Edition PDF excels at identifying and rectifying muscle imbalances, a crucial aspect of injury prevention and optimal performance. Detailed anatomical illustrations reveal how opposing muscle groups work in synergy, highlighting potential weaknesses.

The guide doesn’t simply present exercises; it analyzes which muscles are dominant and which are lagging, offering targeted solutions. It provides specific exercises to strengthen underactive muscles and stretches to release overactive ones, restoring proper movement patterns. This balanced approach promotes joint health and reduces the risk of compensatory injuries stemming from uneven development. The PDF empowers users to create personalized training plans addressing their unique needs.

Downloading and Accessing the PDF

Accessing the Strength Training Anatomy 4th Edition PDF requires careful consideration of sources. While “free” downloads are advertised, these often lead to compromised files or security risks. Legitimate options typically involve purchasing the PDF from reputable online bookstores or directly from the publisher.

Beware of websites offering suspiciously easy downloads; these may contain malware. Paid versions ensure high-quality images and complete content. Compatibility is generally broad, supporting most devices with PDF readers. Users can access the PDF on computers, tablets, and smartphones, enabling convenient study and exercise guidance. Always verify the source’s authenticity before providing any personal information.

Legitimate Sources for PDF Download

Securing a genuine Strength Training Anatomy 4th Edition PDF necessitates utilizing trustworthy platforms. Major online booksellers, such as Amazon and Barnes & Noble, frequently offer the digital version for purchase. Directly visiting the publisher’s website is another reliable avenue, often providing exclusive deals or bundled packages.

Avoid unofficial websites promising “free” downloads, as these pose significant risks. Reputable sources guarantee a malware-free file and complete content. Educational institutions may also provide access through digital libraries. Always check for secure payment gateways and verifiable seller information before completing a transaction. Prioritize legitimate channels to ensure a quality learning experience.

Free vs. Paid Versions

The availability of a “free” Strength Training Anatomy 4th Edition PDF is often misleading and carries substantial risks. While some websites may offer downloads, these frequently contain malware, incomplete content, or copyright violations. The paid version guarantees a complete, accurate, and legally obtained resource.

Investing in the paid PDF ensures access to all detailed illustrations, muscle analyses, and troubleshooting guides. Free versions may lack crucial information or exhibit poor image quality. Supporting the author and publisher through purchase encourages continued high-quality work. Prioritize a legitimate purchase for a reliable and comprehensive learning experience, avoiding potential security threats and ethical concerns.

Compatibility and Device Access

The Strength Training Anatomy 4th Edition PDF is designed for broad compatibility across various devices and operating systems. It typically functions seamlessly on Windows, macOS, Android, and iOS platforms. A PDF reader, such as Adobe Acrobat Reader (free download), is generally required for optimal viewing.

The PDF format allows for easy scaling and zooming on smartphones and tablets, facilitating convenient study during workouts or on the go. File size may vary, but is generally manageable for most devices with sufficient storage. Ensure your device meets the minimum system requirements for the PDF reader to guarantee a smooth and uninterrupted experience.

Applications Beyond Exercise

Beyond its primary use for fitness enthusiasts, the Strength Training Anatomy 4th Edition PDF offers valuable insights for rehabilitation and physical therapy professionals. Understanding muscle mechanics detailed within aids in designing targeted recovery programs. The book’s visualizations assist in explaining movement patterns to patients, improving comprehension and adherence to treatment plans.

Furthermore, the PDF serves as an excellent resource for coaches and athletic trainers seeking to optimize performance. Detailed muscle analysis informs program design, addressing imbalances and preventing injuries. The knowledge gained enhances understanding of biomechanics, leading to more effective training strategies and improved athletic outcomes.

Rehabilitation and Physical Therapy

The Strength Training Anatomy 4th Edition PDF proves invaluable for rehabilitation professionals, offering detailed muscle illustrations crucial for understanding injury mechanisms. Its comprehensive approach aids in designing targeted exercise programs for post-injury recovery, focusing on restoring proper movement patterns and function. The book’s visual nature simplifies explaining complex anatomical concepts to patients, enhancing their understanding and engagement.

Physical therapists can leverage the PDF to identify muscle imbalances contributing to pain or dysfunction. The detailed analysis supports the creation of individualized treatment plans, addressing specific weaknesses and restoring optimal biomechanics. This resource facilitates a more informed and effective approach to patient care, accelerating recovery and preventing re-injury.

Understanding Movement Mechanics

The Strength Training Anatomy 4th Edition PDF excels at visually demonstrating how muscles work together during movement. It breaks down complex exercises into their component parts, revealing the precise muscle activation patterns involved. This detailed insight allows users to grasp the biomechanics of each exercise, optimizing form and maximizing effectiveness.

By illustrating muscle attachments and lines of pull, the PDF clarifies how forces are generated and applied. This understanding is crucial for refining technique and preventing injuries. Whether analyzing simple or complex movements, the book provides a foundational knowledge of human locomotion, empowering individuals to move more efficiently and safely.

Improving Athletic Performance

The Strength Training Anatomy 4th Edition PDF serves as a powerful tool for athletes seeking to enhance their performance. By understanding the specific muscle demands of their sport, athletes can design targeted training programs to improve strength, power, and endurance. The book’s detailed muscle analysis allows for the identification of weaknesses and imbalances that may be hindering athletic potential.

Furthermore, the PDF’s emphasis on proper form and technique minimizes the risk of injury, ensuring athletes can train consistently and effectively. The visual aids and exercise demonstrations facilitate the learning process, enabling athletes to translate anatomical knowledge into practical improvements on the field or in the gym.

Author Frédéric Delavier and His Expertise

Frédéric Delavier is the acclaimed author behind Strength Training Anatomy, bringing a unique blend of artistic skill and scientific knowledge to the field of strength training. He’s renowned for his incredibly detailed anatomical illustrations, which visually demonstrate muscle activation during various exercises. Delavier’s background includes contributions to prominent fitness publications like Monde du Muscle and Men’s Health Germany, establishing him as a respected authority.

His expertise stems from a deep understanding of biomechanics and a commitment to providing accurate, practical information. The 4th Edition PDF benefits immensely from his dedication, offering a resource built on years of research and experience. Delavier’s other works further solidify his position as a leading figure in strength training literature.

Delavier’s Background and Credentials

Frédéric Delavier’s credentials position him as a highly qualified author in the realm of strength training. While specific formal academic degrees aren’t prominently detailed, his extensive practical experience and contributions to respected publications demonstrate a profound understanding of anatomy and exercise physiology. He’s a recognized contributor to Monde du Muscle, a leading French fitness magazine, and Mens Health Germany, showcasing international recognition.

His work transcends simple instruction; it’s a fusion of artistic representation and scientific accuracy. The Strength Training Anatomy 4th Edition PDF is a testament to his dedication, built upon years of observation and analysis. Delavier’s ability to visually dissect movements solidifies his expertise and makes his work invaluable.

Contributions to Strength Training Literature

Frédéric Delavier’s most significant contribution is undoubtedly the Strength Training Anatomy series, particularly the widely-sold 4th edition, available as a PDF. This work revolutionized how individuals visualize and understand muscle engagement during exercise. Selling over 450,000 copies, it’s become a cornerstone resource for trainers and enthusiasts alike.

His approach, blending detailed anatomical illustrations with exercise analysis, was groundbreaking. Delavier didn’t just present exercises; he explained them, revealing the precise muscular actions involved. This focus on anatomical understanding elevates his work beyond typical fitness guides. The Strength Training Anatomy 4th Edition PDF continues to influence modern training methodologies.

Other Works by Frédéric Delavier

Beyond the renowned Strength Training Anatomy series, including the popular 4th edition PDF, Frédéric Delavier has consistently contributed to the field of strength training. He’s a frequent contributor to publications like Monde du Muscle and Mens Health Germany, sharing his expertise with a broad audience. His writing consistently emphasizes the importance of anatomical understanding for effective training.

Delavier’s work extends to detailed exercise guides and analyses, often featuring his signature anatomical illustrations. While Strength Training Anatomy remains his most celebrated achievement, his articles and contributions demonstrate a sustained commitment to educating individuals on proper form and muscle function. Accessing his insights, even through online articles, complements the Strength Training Anatomy 4th Edition PDF.

honeywell vision pro 8000 installation manual

The Honeywell Vision Pro 8000 is a cutting-edge thermostat designed for precise temperature control and energy efficiency. This user-friendly device offers advanced features and a comprehensive installation guide to ensure seamless setup and operation.

1.1 Overview of the Honeywell Vision Pro 8000 Thermostat

The Honeywell Vision Pro 8000 is a state-of-the-art thermostat designed for energy efficiency and precise temperature control. It features a user-friendly interface, advanced scheduling options, and compatibility with various HVAC systems. The device is equipped with smart home integration capabilities, allowing for remote monitoring and control. Its sleek design and intuitive navigation make it a popular choice for modern homes. The thermostat also includes energy-saving settings to optimize heating and cooling performance, ensuring comfort while reducing energy consumption.

1.2 Importance of Proper Installation

Proper installation of the Honeywell Vision Pro 8000 thermostat is crucial for optimal performance and energy efficiency. Incorrect wiring or setup can lead to mechanical failures, safety hazards, or reduced system efficiency. Ensuring all connections are secure and following the installation manual carefully guarantees reliable operation. Proper installation also prevents potential issues like inaccurate temperature control or malfunctioning features. It is essential to adhere to the guidelines provided in the manual to maximize the thermostat’s capabilities and ensure a safe, efficient, and comfortable heating and cooling experience.

System Requirements and Compatibility

The Honeywell Vision Pro 8000 requires compatibility with compatible HVAC systems, electrical specifications, and software versions. Ensure your system meets these requirements for optimal performance.

2.1 Compatible HVAC Systems

The Honeywell Vision Pro 8000 is designed to work with a variety of HVAC systems, including forced air, heat pumps, and radiant floor systems. It is also compatible with dual-fuel systems, ensuring versatile performance across different heating and cooling configurations. Proper compatibility ensures efficient temperature control and energy savings. Always verify your HVAC system’s specifications to confirm compatibility before installation. This ensures optimal performance and avoids potential operational issues.

2.2 Electrical Requirements

The Honeywell Vision Pro 8000 requires a 24V AC power supply, ensuring compatibility with most standard HVAC systems. A common wire (C-wire) is necessary for continuous power, especially for smart features. Proper wiring connections are critical to avoid electrical issues. Always disconnect power before installation to prevent hazards. Verify your system’s electrical specifications to ensure compatibility. If unsure, consult a licensed electrician to guarantee safe and proper installation. Adhering to these requirements ensures optimal performance and prevents potential malfunctions.

2.3 Software and Firmware Compatibility

The Honeywell Vision Pro 8000 is compatible with the latest Honeywell Home software and firmware versions. Regular firmware updates ensure enhanced performance and new features. The thermostat integrates seamlessly with smart home systems like Amazon Alexa and Google Home. Compatibility with mobile apps allows remote control and scheduling. Ensure your system runs the most recent firmware for optimal functionality. Updates are typically automatic but can be manually triggered if needed. Always verify software compatibility before installation to avoid operational issues.

Pre-Installation Steps

Pre-installation steps are essential for a successful Honeywell Vision Pro 8000 setup. Proper preparation ensures a seamless installation process and optimal system performance always.

3.1 Gathering Necessary Tools and Materials

To ensure a smooth installation, gather all required tools and materials beforehand. Essential items include a screwdriver, wire strippers, voltage tester, and drill. Additionally, collect mounting hardware, wires, and any specific components outlined in the Honeywell Vision Pro 8000 manual. Having everything prepared will streamline the process and prevent delays. Always refer to the wiring diagram for specific parts needed for your system configuration.

3.2 Understanding the Wiring Diagram

Understanding the wiring diagram is crucial for a successful installation. The diagram provides a visual representation of the thermostat’s connections, ensuring wires are linked correctly to your HVAC system. Familiarize yourself with the labels and symbols, as they indicate specific terminals and their functions. Misinterpreting the diagram can lead to improper connections, potentially causing system malfunctions. Always cross-reference the diagram with your HVAC system’s configuration to ensure compatibility and safety during the installation process.

3.3 Preparing the Installation Site

Before installing the Honeywell Vision Pro 8000, ensure the installation site is clean and free from obstructions. Turn off the power to your HVAC system at the circuit breaker to avoid electrical hazards. Inspect the area for any existing damage or wear on wires or the wall where the thermostat will be mounted. Gather all necessary tools and materials nearby to streamline the process. A well-prepared site ensures a smooth and efficient installation, reducing the risk of errors or safety issues.

Installation Process

The Honeywell Vision Pro 8000 installation involves mounting the thermostat, connecting wires, and securing components. Follow the step-by-step guide for a smooth and safe setup process.

4.1 Mounting the Thermostat

Begin by turning off the power to your HVAC system. Remove the old thermostat and clean the area. Use the provided mounting bracket to align the Honeywell Vision Pro 8000 with the wall studs. Gently press the thermostat onto the bracket, ensuring it is level. Secure it with screws, making sure not to overtighten. If necessary, use the included spacers for proper alignment. Double-check the thermostat’s position before proceeding to the wiring step. This ensures a stable and accurate installation.

4.2 Connecting the Wires

Start by matching the wires from your old thermostat to the Honeywell Vision Pro 8000. Typically, wires are labeled R, W, Y, G, C, and sometimes O or B. Ensure the power to your HVAC system is off. Connect the R wire to the R terminal, W to W for heating, Y to Y for cooling, G to G for the fan, and C to the common terminal. If present, connect O or B wires for heat pump or reversing valve functionality. Secure all connections firmly to avoid loose wires, which can cause malfunctions. After wiring, restore power and test the system to confirm proper operation.

4.3 Securing the Wiring and Components

Once all wires are connected, secure them using cable ties or clips to keep them organized and prevent damage. Ensure all components are firmly attached to the thermostat and wall to avoid any movement that could disrupt the system. Double-check that no wires are pinched or bent, as this can lead to malfunctions. Properly securing the wiring is essential for the reliable performance and longevity of your Honeywell Vision Pro 8000 thermostat.

Configuration and Setup

The Honeywell Vision Pro 8000 offers a user-friendly configuration process. After installation, power on the device and follow on-screen instructions to set up your preferences, including temperature schedules and system settings. This ensures optimal performance and energy efficiency tailored to your needs.

5.1 Initial Power-On and System Recognition

After installation, power on the Honeywell Vision Pro 8000. The thermostat will perform a self-test, recognizing connected HVAC components. It detects system type (heat, cool, or both) and additional features like humidifiers. Follow on-screen prompts to confirm settings. Ensure all wiring connections are secure for accurate system recognition. Proper initialization is crucial for optimal performance. If issues arise, refer to the wiring diagram or troubleshooting guide. Once recognized, the system is ready for configuration and operation.

5.2 Setting Up the User Interface

After system recognition, navigate the Honeywell Vision Pro 8000’s touchscreen interface to customize settings. Select menu options to adjust temperature units, time format, and display brightness. Choose language preferences and enable features like energy-saving modes. Use the intuitive interface to set up daily schedules or override default settings. Ensure all preferences are reviewed and saved to maintain personalized comfort. The user-friendly design simplifies configuration, making it easy to tailor the thermostat to your needs. Refer to the manual for detailed guidance on interface customization.

5.3 Configuring Heating and Cooling Schedules

Configure heating and cooling schedules by accessing the menu and selecting the scheduling option. Choose between weekday and weekend settings or create custom schedules. Set desired temperatures for specific times to optimize energy use and comfort. Enable energy-saving modes to reduce consumption during off-peak hours. Review and adjust schedules as needed to ensure they align with your daily routine. Save preferences to activate the programmed settings. This feature ensures efficient temperature management while maintaining personalized comfort levels throughout the day.

Wiring Diagrams and Connections

Refer to the Honeywell Vision Pro 8000 wiring diagram for precise connections. Ensure correct wire coloring matches the terminal connections for proper system functionality and safety.

6.1 Standard Wiring Configuration

The Honeywell Vision Pro 8000 requires a specific wiring setup to ensure proper functionality. Refer to the provided wiring diagram for detailed connections. Typically, the thermostat uses color-coded wires, such as R (red) for 24V power, W (white) for heating, and Y (yellow) for cooling. Ensure all wires are securely connected to the corresponding terminals. Follow the diagram carefully to avoid mismatches, as incorrect wiring can lead to system malfunctions. Double-check connections before powering on the system to guarantee safe and efficient operation.

6.2 Optional Wiring for Advanced Features

For enhanced functionality, the Honeywell Vision Pro 8000 supports optional wiring configurations. These include connections for humidification, dehumidification, and remote sensors. The C (common) wire may be required for certain advanced features. Refer to the wiring diagram for specific instructions. Optional wiring allows for integration with smart home systems and additional temperature sensors. Ensure all connections are secure and compatible with your HVAC system. Properly configuring these optional wires can optimize system performance and expand functionality, but incorrect connections may lead to malfunctions. Always follow the manual’s guidelines for advanced setups.

6.3 Troubleshooting Common Wiring Issues

Common wiring issues with the Honeywell Vision Pro 8000 include loose connections, incorrect wire types, and short circuits. Always verify connections match the wiring diagram. If the display shows an error, check for open circuits or reversed polarity. Use a multimeter to test wire continuity. Ensure all wires are securely fastened to avoid malfunctions. If issues persist, consult the manual or contact a professional. Proper troubleshooting ensures reliable performance and prevents potential damage to the system. Always turn off power before inspecting or repairing wiring.

Advanced Features and Customization

The Honeywell Vision Pro 8000 offers advanced customization options, enabling users to tailor temperature settings, energy-saving modes, and smart home integrations for enhanced comfort and efficiency.

7.1 Smart Home Integration

The Honeywell Vision Pro 8000 seamlessly integrates with popular smart home systems, including Amazon Alexa and Google Home. This allows for voice control and centralized management of your HVAC system. Users can also access advanced features through smartphone apps, enabling remote temperature adjustments and energy monitoring. The thermostat’s compatibility with smart home hubs enhances its functionality, offering a unified platform for all smart devices. This integration not only improves convenience but also optimizes energy efficiency, making it a versatile solution for modern homes.

7.2 Remote Access and Control

The Honeywell Vision Pro 8000 offers remote access and control through the Honeywell Home app, allowing users to adjust settings, monitor system performance, and receive notifications from their smartphone. This feature provides unparalleled convenience, enabling users to manage their HVAC system from anywhere. Remote control is particularly useful for optimizing energy usage, as users can adjust temperatures or schedules even when they’re not at home. This functionality enhances comfort and efficiency, making it a key feature for modern smart home solutions.

7.3 Energy-Saving Settings

The Honeywell Vision Pro 8000 offers advanced energy-saving settings to optimize your HVAC system’s efficiency. Features like programmable schedules, energy usage reports, and geofencing allow you to tailor your system’s operation to your lifestyle. The thermostat also includes smart algorithms that learn your preferences and adjust temperatures accordingly. These settings help reduce energy waste and lower utility bills. By enabling features like auto-away mode and smart recovery, you can ensure your system runs efficiently without compromising comfort. Regular updates and insights from the Honeywell Home app further enhance energy-saving capabilities.

Maintenance and Upkeep

Regular maintenance ensures optimal performance of the Honeywell Vision Pro 8000. Clean the thermostat, check for firmware updates, and verify system functionality to maintain efficiency and accuracy.

8.1 Cleaning the Thermostat

Regular cleaning ensures the Honeywell Vision Pro 8000 operates efficiently. Use a soft, dry cloth to gently wipe the display and exterior. Avoid harsh chemicals or liquids, as they may damage the device. Turn off power before cleaning to prevent electrical issues. For stubborn marks, lightly dampen the cloth with water, but ensure no moisture enters the thermostat. Cleaning helps maintain accuracy and extends the product’s lifespan. Always refer to the manual for specific cleaning instructions to avoid voiding the warranty or causing damage.

8.2 Updating Firmware

Regular firmware updates are essential for optimal performance of the Honeywell Vision Pro 8000. To update, ensure the thermostat is connected to Wi-Fi. Access the settings menu, select “Firmware Update,” and follow on-screen instructions. The device will automatically download and install the latest version. During the update, avoid turning off the power. Once complete, the thermostat will restart. Firmware updates enhance functionality, fix bugs, and improve compatibility. Always refer to the installation manual for detailed steps to ensure a smooth update process and maintain system efficiency.

8.3 Regular System Checks

Regular system checks ensure the Honeywell Vision Pro 8000 operates efficiently. Inspect the thermostat’s display for clarity and responsiveness. Verify all wiring connections are secure and free from damage. Check the HVAC system’s performance to ensure proper heating and cooling. Review the thermostat’s settings to confirm they align with your preferences. Additionally, monitor the system’s energy consumption and adjust settings if necessary. Regular checks help maintain optimal performance and prevent potential issues. Always refer to the installation manual for guidance on performing these checks effectively.

Troubleshooting Common Issues

Troubleshooting the Honeywell Vision Pro 8000 involves identifying and resolving issues like display errors, connectivity problems, or temperature control malfunctions. Refer to the manual for step-by-step solutions.

9.1 Display Issues and Error Codes

Display issues on the Honeywell Vision Pro 8000, such as a blank screen or frozen interface, can often be resolved by restarting the device. Error codes like “E1” or “E2” indicate specific problems, such as sensor malfunctions or communication errors. Refer to the manual for a list of error codes and their meanings. If the display remains unresponsive, check wiring connections or perform a factory reset. Ensure the thermostat is properly powered and update firmware if necessary. Consulting the troubleshooting section of the manual is recommended for detailed solutions.

9.2 Temperature Control Problems

Temperature control issues with the Honeywell Vision Pro 8000 may arise from incorrect thermostat settings or sensor malfunctions. Ensure the setpoint is accurately configured and the system is properly calibrated. If the thermostat isn’t reaching the desired temperature, check for drafts or incorrect sensor placement. Verify wiring connections and ensure the HVAC system is functioning correctly. Restarting the thermostat or resetting the schedule may resolve minor glitches. For persistent issues, consult the manual or contact a professional to diagnose and repair any underlying system problems.

9.3 Connectivity and Network Issues

Connectivity problems with the Honeywell Vision Pro 8000 may occur due to unstable Wi-Fi connections or incorrect network configurations. Ensure the thermostat is connected to the correct network and the signal strength is adequate. Restart the thermostat and router to resolve temporary glitches. If issues persist, check for firmware updates or reset the thermostat to factory settings. Verify that the device is properly linked to your smart home system and that all credentials are accurate. Consult the manual for detailed troubleshooting steps to restore connectivity and remote access functionality.

Safety Precautions and Compliance

Ensure electrical safety by disconnecting power before installation. Handle the thermostat carefully to prevent damage. Comply with local regulations and safety standards for proper installation and operation.

10.1 Electrical Safety Guidelines

Always disconnect the power supply before starting installation to avoid electrical shock. Verify the system voltage matches the thermostat’s requirements. Use properly rated tools and avoid touching live wires. Ensure all connections are secure to prevent short circuits. Follow local electrical codes and manufacturer instructions. Keep the area dry to prevent electrical hazards. If unsure, consult a licensed electrician. Proper grounding is essential for safe operation. Never bypass safety features or ignore warning labels. Adhere to these guidelines to ensure a safe and reliable installation process.

10.2 Compliance with Local Regulations

Ensure the Honeywell Vision Pro 8000 installation complies with local electrical and building codes. Verify all applicable regulations and obtain necessary permits. The system must meet regional safety and energy standards. Refer to the manual for specific requirements. Compliance ensures proper functionality and avoids legal issues. Always check for updates to local regulations before proceeding. Proper adherence guarantees a safe and legally compliant installation, aligning with both manufacturer guidelines and local authority standards.

10.3 Emergency Shutdown Procedures

In case of an emergency, immediately switch off the Honeywell Vision Pro 8000 thermostat. Disconnect power at the circuit breaker or fuse box. Ensure the system is completely powered down before attempting any repairs. Refer to the manual for specific shutdown instructions. If issues persist, contact a certified technician. Always prioritize safety and follow proper procedures to avoid potential hazards. Regular maintenance can help prevent emergencies, but knowing shutdown steps is crucial for unexpected situations.

Conclusion and Final Checks

With proper installation complete, ensure the Honeywell Vision Pro 8000 operates efficiently. Verify all settings and perform final checks to confirm system performance and comfort.

11.1 Verifying Proper Installation

After completing the installation, verify that the Honeywell Vision Pro 8000 is correctly mounted and all wires are securely connected. Ensure the thermostat powers on and recognizes the HVAC system. Check for proper display functionality and confirm that all buttons and controls respond correctly. Review the wiring diagram to ensure connections match the manual’s instructions. Verify that the thermostat is level and firmly attached to the wall. Consult the user manual for any specific verification steps to ensure optimal performance and safety.

11.2 Testing System Performance

After installation, test the Honeywell Vision Pro 8000 by running a full system cycle. Check heating, cooling, and fan modes to ensure smooth operation. Verify temperature accuracy by comparing the display with a reliable thermometer. Test transitions between modes to confirm seamless operation. Ensure the user interface responds correctly to input and adjust settings as needed. Check for any error messages or unusual behavior. Perform these tests under normal operating conditions to validate system performance and ensure reliability.

11.3 Finalizing the Setup

Once all tests are successful, save your settings and enable any advanced features. Program your desired heating and cooling schedules for optimal energy use. Review the system configuration to ensure all settings align with your preferences. Perform a final check to confirm that the thermostat is functioning correctly and all features are enabled. Address any minor issues promptly to ensure smooth operation. This completes the setup process, and your Honeywell Vision Pro 8000 is now ready for daily use.

certified construction manager exam sample questions pdf

The Certified Construction Manager (CCM) exam is a prestigious credential validating expertise in construction management. It assesses knowledge in project management, cost, and time management, with sample questions aiding preparation by identifying gaps and improving strategies.

Overview of the CCM Credential

The Certified Construction Manager (CCM) credential is a prestigious certification for professionals in the construction industry, offered by the Construction Management Association of America (CMAA). It validates expertise in construction management, enhancing career opportunities and demonstrating a high level of proficiency. The credential is earned by passing a rigorous exam that assesses knowledge in core competencies such as project management, cost management, and time management. Sample questions and study materials are essential for preparation, providing insights into the exam format and content. Achieving the CCM designation signifies a commitment to excellence and is recognized as a benchmark of professionalism in the field.

Importance of the CCM Exam in Construction Management

The CCM exam plays a pivotal role in construction management by setting a high standard of professionalism and expertise. It ensures that certified professionals possess the necessary skills to manage complex projects effectively. The exam evaluates knowledge in core areas such as project execution, cost control, and risk management, making it a trusted credential for employers. By passing the exam, individuals demonstrate their ability to handle real-world challenges, enhancing their credibility and career prospects. Sample questions and study resources are vital for preparation, as they familiarize candidates with the exam format and content, ultimately contributing to the advancement of the construction industry.

Structure and Content of the CCM Exam

The CCM exam focuses on seven core competencies, including project management, cost, and time management. It features multiple-choice and scenario-based questions, assessing practical application and theoretical knowledge.

Exam Format and Question Types

The CCM exam consists of multiple-choice and scenario-based questions, assessing both theoretical knowledge and practical application. Multiple-choice questions test understanding of core competencies, while scenario-based questions present real-world challenges, requiring analysis and problem-solving. Time management questions involve calculating schedules, ensuring proficiency in planning and execution. The exam’s format mirrors industry practices, with a focus on construction management principles. Sample questions align with these formats, helping candidates familiarize themselves with the exam’s structure and content. Understanding the question types is crucial for effective preparation and confident performance on exam day.

Core Competencies Covered in the Exam

The CCM exam evaluates seven core competencies essential for construction management professionals. These include project management, covering planning and execution, cost management, focusing on budgeting and financial analysis, and time management, emphasizing scheduling and progress monitoring. Additionally, the exam assesses contract administration, risk management, quality control, and safety management. Each competency requires both theoretical knowledge and practical application, as reflected in sample questions. These questions mirror the exam’s content, helping candidates understand and master the competencies. By practicing with relevant scenarios, professionals can enhance their problem-solving skills and ensure comprehensive preparation for the exam.

Time Management and Calculation Questions

The CCM exam includes a significant portion of time management and calculation questions, requiring manual computations of project schedules. Candidates must perform forward-pass and backward-pass analyses to determine critical paths and task sequences. These questions simulate real-world scenarios, testing the ability to manage timelines effectively. Sample questions often involve calculating activity durations, identifying delays, and adjusting schedules. Practicing these problems is crucial, as they assess both technical skills and the ability to apply knowledge under time constraints. Accurate and efficient calculations are essential for success in this section, making it a key focus area during preparation with sample questions and study guides.

Benefits of Using Sample Questions for Exam Preparation

Sample questions enhance exam preparation by identifying knowledge gaps, improving test-taking strategies, and familiarizing candidates with the exam format. They provide practical insights, boosting confidence and readiness for the CCM exam.

Identifying Knowledge Gaps

Sample questions are invaluable for pinpointing areas where additional study is needed. By tackling CCM exam sample questions, candidates can uncover gaps in their understanding of core competencies, such as project management, cost control, and scheduling. These questions highlight weaknesses, allowing focused improvement. For instance, if a candidate struggles with time management scenarios, they can dedicate more time to studying scheduling techniques. Detailed explanations provided with sample questions further clarify complex concepts, ensuring a deeper grasp of the material. Regularly assessing performance through practice exams helps track progress and refine study plans, ultimately strengthening overall readiness for the certification exam.

Improving Test-Taking Strategies

Engaging with CCM exam sample questions enhances test-taking strategies by familiarizing candidates with the exam format and question types. Practicing multiple-choice and scenario-based questions helps develop skills in time management, eliminating incorrect answers, and selecting the best responses. Sample questions also allow candidates to refine their approach to complex problems, such as calculating schedules or analyzing project risks. By repeatedly applying these strategies, candidates build confidence and efficiency, ensuring they can navigate the exam effectively. Regular practice with sample questions sharpens problem-solving abilities and improves accuracy, enabling candidates to perform at their best on exam day.

Enhancing Familiarity with Exam Format

Using CCM exam sample questions helps candidates become familiar with the exam format, including question types and time constraints. Practicing with multiple-choice and scenario-based questions mirrors the actual exam experience, reducing anxiety and building confidence. Sample questions also reveal the structure of calculation-heavy sections, such as time management and scheduling, allowing candidates to refine their problem-solving speed. By exposing candidates to the exam’s layout and content, sample questions enable them to better allocate time during the actual test. This familiarity ensures candidates can focus on demonstrating their knowledge rather than navigating an unfamiliar format, ultimately improving their overall performance and readiness for the exam.

Accessing CCM Exam Sample Questions

CCM exam sample questions are available through online platforms, self-study kits, and third-party publications. These resources provide practice exams and question banks, mirroring the actual exam format and content.

Online Platforms and Question Banks

Online platforms offer comprehensive CCM exam sample questions and question banks, mirroring the actual exam’s format and rigor. These resources provide timed practice exams, review modes, and detailed explanations to enhance understanding. Many platforms align their content with the seven core competencies, ensuring relevance and depth. Subscription models often grant access to extensive question libraries, while interactive tools like quizzes and simulations boost engagement. These platforms are ideal for self-paced learning, allowing candidates to identify weaknesses and refine strategies. With realistic scenarios and practical applications, online question banks are invaluable for mastering the exam’s challenges and improving test-taking skills effectively.

Self-Study Kits and Practice Exams

Self-study kits and practice exams are essential tools for CCM exam preparation, offering structured learning materials and realistic question scenarios. Organizations like CMAA provide kits that include practice questions, though user reviews highlight variability in their comprehensiveness. These kits often align with the seven core competencies, covering topics like project management and cost control. Practice exams simulate the actual test environment, helping candidates master time management and question strategies. Many kits include detailed explanations for correct and incorrect answers, enhancing understanding and retention. By leveraging these resources, candidates can identify knowledge gaps, refine their test-taking skills, and build confidence in tackling the exam’s challenging multiple-choice and scenario-based questions effectively.

Third-Party Publications and Resources

Third-party publications and resources provide valuable supplementary materials for CCM exam preparation. Books like the Certified Construction Manager (CCM) – Course Handbook & Exam Questions offer comprehensive guides and practice questions. Websites such as Amazon and Createspace provide access to PDF materials, including sample questions and study guides. These resources often include detailed explanations and cover a wide range of topics aligned with the seven core competencies. Many third-party publications also offer scenario-based questions and practical applications, helping candidates understand complex concepts. While these materials are not officially affiliated with the CCM exam, they are widely recognized for their effectiveness in preparing candidates. Evaluating the credibility and alignment of these resources with the exam content is essential for optimal preparation.

Key Features of Effective CCM Practice Questions

Effective CCM practice questions should align with exam content, include realistic scenarios, and provide detailed explanations to enhance understanding and practical application of construction management principles.

Alignment with the Exam Content

Effective CCM practice questions must closely align with the exam content, covering the seven core competencies such as project management, cost control, and time scheduling. They should mirror the actual exam’s format, including multiple-choice and scenario-based questions, ensuring candidates are familiar with the types of questions they will encounter. Practice questions should also reflect the depth and complexity of the exam, addressing both theoretical knowledge and practical applications. This alignment helps candidates identify knowledge gaps and focus their study efforts effectively. By using practice questions that match the exam content, candidates can build confidence and improve their readiness for the actual test.

Realistic Scenarios and Practical Applications

Effective CCM practice questions incorporate realistic scenarios and practical applications, mirroring real-world challenges in construction management. These questions present candidates with situational problems, such as project delays or budget overruns, requiring them to apply theoretical knowledge to find solutions. By simulating actual workplace dilemmas, practice questions help candidates develop problem-solving skills and think critically. This approach ensures that candidates are not only familiar with exam formats but also prepared to handle practical issues they may encounter on the job. Realistic scenarios enhance learning by bridging the gap between theory and practice, making candidates more confident and competent for both the exam and their professional roles.

Detailed Explanations and Feedback

Detailed explanations and feedback are essential components of effective CCM practice questions. These explanations provide clarity on why certain answers are correct and others are incorrect, helping candidates understand their mistakes. By breaking down complex concepts, they enhance learning and retention. Feedback also highlights areas for improvement, allowing candidates to focus on weak spots. Many online platforms and study guides offer explanations aligned with the CCM exam’s core competencies, ensuring relevance and depth. This feature not only improves knowledge but also builds confidence, as candidates gain a clearer understanding of the material. Comprehensive feedback is a valuable tool for refining skills and achieving exam success.

Preparing for the CCM Exam

Effective preparation involves dedicated study, practice questions, and a structured plan. Utilize sample questions to understand core competencies and refine your knowledge for exam success.

Developing a Structured Study Plan

A well-organized study plan is essential for CCM exam success. Begin by assessing strengths and weaknesses across the seven core competencies. Allocate more time to areas needing improvement, such as project management or cost control. Break study sessions into manageable chunks, focusing on specific topics within each competency. Regular review sessions help reinforce concepts and identify gaps. Incorporate practice questions and sample exams to simulate real test conditions and track progress. Consistency and focused effort are key, ensuring a balanced approach to mastering construction management principles and practices.

Utilizing Flashcards and Practice Questions

Flashcards and practice questions are invaluable tools for CCM exam preparation. Flashcards help memorize key terms, definitions, and formulas, while practice questions simulate exam conditions. Regularly reviewing flashcards sharpens retention of complex concepts. Practice questions, especially those aligned with the seven core competencies, reveal knowledge gaps and improve problem-solving skills. They also enhance familiarity with the exam format, reducing anxiety. By focusing on understanding underlying concepts rather than memorizing answers, candidates can better apply knowledge to real-world scenarios. Consistent use of these tools strengthens confidence and readiness, ensuring a thorough grasp of construction management principles and practices essential for exam success.

Engaging with Online Courses and Study Guides

Online courses and study guides are essential resources for CCM exam preparation. They provide detailed explanations of key concepts within the seven core competencies, enhancing understanding and retention. Many courses include interactive elements like quizzes and practice questions, allowing candidates to self-assess and target weak areas. Study guides often align with the exam content, offering insights into question types and formats. Instructor support in online courses enables candidates to clarify doubts and receive personalized feedback. Additionally, these resources frequently include practice exams that simulate real test conditions, helping candidates improve time management and question strategies. Leveraging these tools ensures a comprehensive and structured approach to exam preparation, boosting confidence and readiness for success.

Understanding the Seven Core Competencies

The CCM exam covers seven core competencies: project management, cost management, time management, contract administration, risk management, quality control, and safety management, ensuring comprehensive expertise in construction management.

Project Management and Execution

Project management and execution are critical components of the CCM exam, focusing on planning, scheduling, and monitoring construction projects. Sample questions emphasize the importance of effective project control, ensuring timely delivery and adherence to budgets. These questions often present scenarios requiring the application of tools like Gantt charts and critical path methods. Understanding resource allocation, risk mitigation, and communication strategies is essential. Sample questions also highlight the need for adaptability in managing project changes and stakeholder expectations. By practicing these scenarios, candidates can refine their problem-solving skills and improve their ability to execute projects efficiently. This competency is vital for demonstrating leadership and organizational skills in real-world construction environments.

Cost Management and Financial Analysis

Cost management and financial analysis are fundamental to the CCM exam, focusing on budgeting, cost control, and financial forecasting. Sample questions often involve scenarios requiring the application of cost estimation techniques and financial tools. Candidates must demonstrate the ability to analyze project costs, identify cost-saving opportunities, and manage financial risks. These questions also cover profit projections, cash flow management, and cost-benefit analysis. By practicing these scenarios, candidates can improve their ability to make data-driven financial decisions. Effective cost management is crucial for ensuring project profitability and stakeholder satisfaction. Sample questions help candidates refine their skills in aligning financial strategies with project goals, enhancing their expertise in construction financial management.

Time Management and Scheduling

Time management and scheduling are critical components of the CCM exam, focusing on efficient project timelines and resource allocation. Sample questions often involve calculating forward-pass and backward-pass schedules, ensuring candidates can manage delays and maintain project milestones. These questions test the ability to analyze scenarios, prioritize tasks, and optimize schedules. Practice questions emphasize the importance of accurate time estimation and adherence to deadlines. Candidates must demonstrate proficiency in using tools like Gantt charts and critical path methods. Strong time management skills are essential for minimizing delays and ensuring project success. Sample questions help candidates refine their scheduling strategies, improving their ability to handle complex timelines effectively.

Contract Administration and Risk Management

Contract administration and risk management are vital skills assessed in the CCM exam, ensuring projects are executed smoothly and disputes are minimized. Sample questions address contract interpretation, compliance, and negotiation, while also focusing on identifying and mitigating risks. Candidates must demonstrate the ability to analyze contractual obligations and develop strategies to manage potential risks. Practice questions often present real-world scenarios, such as resolving disputes or addressing unforeseen site conditions. Effective risk management techniques, like contingency planning and liability assessment, are also tested. By practicing these questions, candidates can enhance their ability to navigate complex contractual situations and implement proactive risk management strategies, ensuring project stability and compliance with legal standards.

Quality Control and Safety Management

Quality control and safety management are critical components of the CCM exam, ensuring projects meet standards and maintain a safe working environment. Sample questions focus on developing inspection plans, implementing quality assurance processes, and adhering to safety regulations. Candidates are tested on their ability to identify defects, address non-conformance, and manage safety protocols. Practical scenarios include responding to safety incidents and ensuring compliance with OSHA guidelines. Effective quality control strategies, such as corrective actions and continuous improvement, are also emphasized. By practicing these questions, candidates can refine their skills in balancing quality and safety with project timelines and budgets, ensuring a safe and high-quality project outcome.

Strategies for Success

Mastering multiple-choice and scenario-based questions is key. Focus on eliminating incorrect answers, managing time effectively, and applying practical knowledge. Practice exams build confidence and refine test-taking skills.

Mastering Multiple-Choice Questions

Mastering multiple-choice questions is crucial for success on the CCM exam. These questions assess your understanding of core construction management principles. Effective strategies include carefully reading each question, eliminating obviously incorrect answers, and selecting the best option. Time management is key; allocate sufficient time per question to avoid rushing. Practice exams are invaluable for familiarizing yourself with the format and improving accuracy. They help identify knowledge gaps and refine test-taking skills. Regular review of sample questions enhances your ability to apply theoretical knowledge to practical scenarios, ensuring confidence and readiness for the exam.

Approaching Scenario-Based Questions

Scenario-based questions on the CCM exam require applying theoretical knowledge to practical construction management situations. These questions present realistic scenarios, asking you to analyze the context, identify key issues, and choose the best course of action. To excel, adopt a systematic approach: read the scenario thoroughly, understand the problem, and evaluate each answer option. Consider the implications of each choice and align it with best practices in construction management. Practice with sample questions helps refine your problem-solving skills and improves your ability to think critically under exam pressure. Regular review of scenario-based questions enhances your readiness to tackle complex, real-world challenges effectively.

Effective Time Management During the Exam

Effective time management is crucial for success on the CCM exam. Allocate time wisely, ensuring you address all questions without rushing. Practice with sample questions helps you gauge your pace and identify areas requiring more attention. Prioritize questions based on familiarity, answering easier ones first to secure initial points. For complex questions, such as scenario-based or calculation-heavy ones, allocate additional time to avoid errors. Regularly review your progress to stay on track and adjust your strategy as needed. By mastering time management through practice, you can approach the exam with confidence, ensuring you maximize your score and demonstrate your expertise in construction management.

Conclusion and Final Tips

Utilize sample questions to refine your strategy and build confidence. Stay focused, manage time effectively, and approach each question methodically. Success in the CCM exam requires dedication and thorough preparation.

Summarizing Key Preparation Strategies

Effective preparation for the Certified Construction Manager (CCM) exam involves a combination of strategies. Utilize sample questions and practice exams to identify knowledge gaps and refine test-taking skills. Focus on understanding the seven core competencies, such as project management and cost control, to build a strong foundation. Allocate time for regular review sessions and incorporate flashcards for memorizing key terms. Engage with online courses and study guides to deepen your understanding of practical applications. Practice scenario-based questions to enhance problem-solving abilities. Stay consistent, manage time wisely during the exam, and maintain confidence. Consulting multiple resources, including sample question PDFs, ensures comprehensive preparation and increases your chances of success.

Staying Confident and Focused

Confidence and focus are critical for excelling in the Certified Construction Manager (CCM) exam. Regularly practicing with sample questions and mock exams helps build familiarity with the format, reducing exam-day anxiety. Maintain a consistent study routine, ensuring adequate time for review and reflection. Prioritize understanding concepts over memorization, as this fosters a deeper grasp of construction management principles. Engage in positive affirmations and visualize success to stay motivated. Additionally, incorporate mindfulness or relaxation techniques to manage stress. A well-balanced approach, combining focused study with mental well-being, ensures peak performance. By staying confident and maintaining concentration, you can effectively navigate the exam and achieve your goal of becoming a certified construction manager.