Mighty Mule Keypad Owners Manual: A Comprehensive Guide
Welcome! This manual details operation of your Mighty Mule keypad, ensuring secure gate access and providing a thorough understanding of its features․

Mighty Mule keypad systems represent a cornerstone of automated gate and access control, offering robust security and convenient operation for residential and commercial properties․ These systems are designed for seamless integration with Mighty Mule gate operators, providing a user-friendly experience for both owners and authorized users․
Keypad technology allows for controlled access via personalized entry codes, eliminating the need for physical keys and enhancing overall security․ The systems prioritize ease of programming, enabling quick addition or deletion of user codes, and offer features like temporary access codes for visitors or service personnel․ Understanding the core functionalities of your Mighty Mule keypad is crucial for maximizing its benefits and maintaining a secure environment․ This guide will walk you through every step․
Understanding Keypad Components
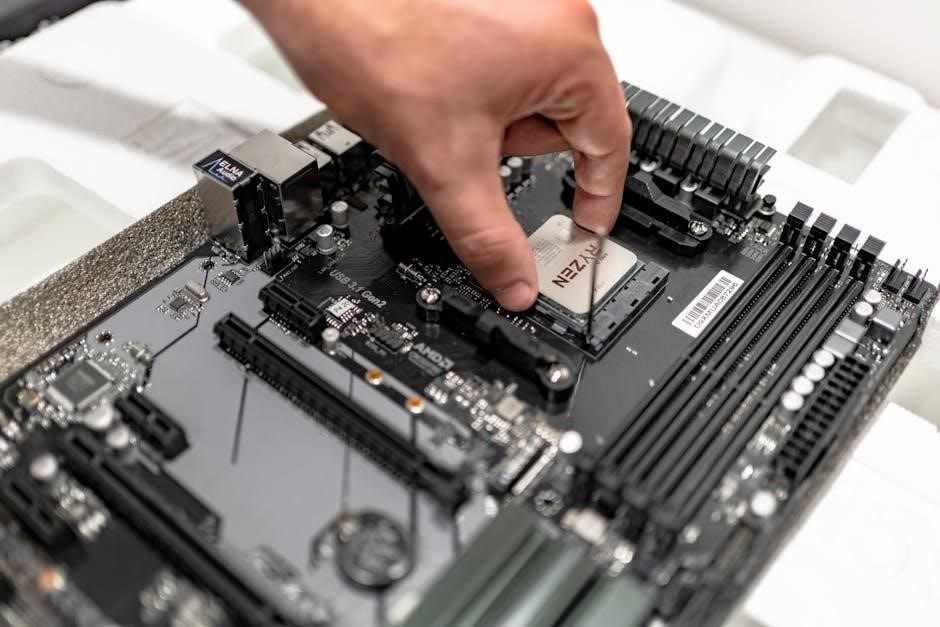
A Mighty Mule keypad system typically comprises several key components working in harmony․ The keypad itself is the primary interface, featuring durable buttons for code entry and often an LCD screen for visual feedback․ A protective weatherproof enclosure shields the internal electronics from the elements, ensuring reliable operation․
The keypad’s circuit board houses the processing power, managing code recognition and communication with the gate operator․ A power source, usually batteries or a hardwired connection, provides the necessary energy․ Finally, a communication wire connects the keypad to the gate operator, transmitting signals to trigger gate activation․ Familiarizing yourself with these components aids in troubleshooting and maintenance, ensuring your system functions optimally for years to come․
Keypad Programming Basics
Programming your Mighty Mule keypad involves setting up user codes for gate access․ Typically, this begins by entering the master code, a pre-set sequence granting administrative privileges․ Accessing the programming mode allows you to add new user codes, assigning unique numbers to authorized individuals․
The system often supports varying code lengths for enhanced security․ Remember to document all assigned codes for easy reference․ Programming also includes setting access schedules, limiting when specific codes are active․ Always test new codes thoroughly after programming to confirm functionality․ Refer to the full manual for specific button combinations and detailed instructions tailored to your keypad model, ensuring a secure and convenient access system․
Initial Keypad Setup & Activation
Initial setup of your Mighty Mule keypad requires careful attention to ensure proper functionality․ Begin by installing batteries, observing correct polarity․ Power on the keypad and allow it to initialize – this may take a few moments․ The first step is typically entering the factory-set master code, found in your documentation․
This code grants access to programming features․ Next, you’ll likely be prompted to change the master code for security․ Following this, perform a range test to confirm communication with your gate operator․ Ensure the keypad is securely mounted and protected from the elements․ Finally, test a pre-programmed code to verify successful activation and gate operation․ Refer to the complete manual for model-specific instructions․

Advanced Keypad Features
Explore sophisticated options like user-specific access schedules, holiday modes, and advanced security protocols for enhanced control and personalized gate management․
Adding New Users & Codes
To add a new user, first enter the programming mode using the master code․ Navigate to the “Add User” function, typically indicated by a specific menu option on your Mighty Mule keypad․ You will then be prompted to enter a unique four-digit code for the new user․
Ensure the code is memorable for the user but not easily guessable by others․ After entering the code, the system may ask you to confirm it․ Some models allow assigning names or descriptions to each user for easier management․

Repeat this process for each additional user you wish to add․ Always test the new code immediately after programming to verify functionality․ Refer to your specific model’s instructions for detailed steps, as menu options can vary․ Proper user code management is crucial for maintaining gate security․
Deleting Users & Codes

Removing user access is essential for security when individuals no longer require gate entry․ Begin by entering the programming mode using your master code․ Locate the “Delete User” or “Remove Code” function within the keypad’s menu system․
You’ll likely be prompted to enter the user’s code you wish to delete, or a user ID if your system utilizes one․ Confirm the deletion when requested to prevent accidental removals․ Some systems may require a secondary confirmation step․
Always test after deleting a code to ensure the user no longer has access․ Regularly review and remove outdated codes to maintain a secure gate operation․ Consult your specific Mighty Mule model’s manual for precise instructions, as menu structures differ․
Temporary Access Codes: Setup & Management

Creating temporary codes provides controlled access for visitors, service personnel, or deliveries․ Access the programming mode using your master code and navigate to the “Temporary Code” or “One-Time Use Code” function․
Input the desired code and, crucially, set an expiration date and time․ Many systems allow you to specify the number of uses before the code becomes invalid․ Some models offer options for restricting access to specific times of day․
Carefully document all temporary codes issued, including the recipient and expiration details․ Regularly review and delete expired codes to maintain security․ Refer to your Mighty Mule model’s manual for specific programming steps and available features․
Master Code Security & Resetting
Your master code is the key to all keypad programming functions; safeguarding it is paramount․ Avoid using easily guessable numbers like birthdays or addresses․ Regularly change the master code, especially after initial setup or if you suspect compromise․
If the master code is forgotten, a factory reset procedure is usually required․ Caution: this will erase all user codes and settings․ Consult your specific Mighty Mule model’s manual for detailed reset instructions, as procedures vary significantly․
Some systems offer a backup master code or a reset key; Document these securely, separate from the primary master code․ Always test the reset process in a controlled environment before relying on it in an emergency․

Troubleshooting Common Keypad Issues
Facing problems? This section provides solutions for typical keypad malfunctions, ranging from unresponsive buttons to communication failures with your gate system․
Keypad Not Responding
Is your Mighty Mule keypad completely unresponsive? First, verify the keypad has fresh batteries; low power is a frequent culprit․ Replace them with quality alkaline batteries, ensuring correct polarity․ Next, check the wiring connections between the keypad and the gate operator – loose connections can interrupt signal transmission․ Inspect the wires for any visible damage, like cuts or corrosion․
If the wiring appears secure, attempt a keypad reset following the instructions in the ‘Master Code Security & Resetting’ section․ Sometimes, a simple reset can resolve minor software glitches․ Ensure the keypad isn’t physically obstructed or damaged․ Consider environmental factors; extreme temperatures or moisture can affect functionality․ If issues persist, consult the full manual or contact Mighty Mule support for further assistance, providing your keypad model number․
Incorrect Code Errors
Experiencing frequent “Incorrect Code” errors with your Mighty Mule keypad? Double-check the entered code for accuracy, paying close attention to capitalization (if applicable) and number sequence․ Remember that exceeding the maximum number of incorrect attempts may temporarily lock the keypad for security reasons – consult the manual for lockout duration and reset procedures․
Verify the user code is still active within the system; codes can be accidentally deleted or disabled․ If a new user was recently added, ensure the code was programmed correctly․ Consider potential interference from other wireless devices, though this is less common․ If the problem persists with multiple valid codes, a keypad reset (refer to ‘Master Code Security & Resetting’) might be necessary․ Contact Mighty Mule support if the issue continues, providing details about the codes affected․
Low Battery Indicators & Replacement
Your Mighty Mule keypad utilizes batteries to maintain operation․ A low battery indicator, typically a flashing light or on-screen message, signals the need for replacement․ Ignoring this warning can lead to keypad malfunction and gate access issues․ Use only the battery type specified in this manual – incorrect batteries can damage the unit or reduce its lifespan․
Before replacing, it’s wise to note any programmed codes to avoid re-entry․ Carefully open the battery compartment (refer to ‘Understanding Keypad Components’ for location) and replace the old batteries with fresh ones, ensuring correct polarity (+/-)․ After replacement, test the keypad functionality immediately․ Dispose of old batteries responsibly, following local regulations․ Regular battery checks are recommended for consistent performance․
Communication Errors with Gate Operator
If your Mighty Mule keypad fails to operate the gate, a communication error may exist․ This indicates the keypad isn’t properly signaling the gate operator․ First, verify the keypad’s antenna is securely connected and undamaged․ Check for obstructions between the keypad and the gate operator – metal objects can interfere with the radio frequency signal․
Ensure the gate operator’s receiver is powered on and functioning correctly․ Refer to your gate operator’s manual for troubleshooting steps․ If the problem persists, attempt to re-sync the keypad with the gate operator following the ‘Initial Keypad Setup & Activation’ instructions․ If re-syncing fails, contact a qualified technician for assistance, as internal component issues may require professional repair․

Keypad Maintenance & Care
Regular upkeep is vital! Consistent cleaning and protection from harsh elements will maximize your Mighty Mule keypad’s lifespan and reliability․
Cleaning Procedures
Maintaining a clean keypad ensures optimal functionality and longevity․ Begin by disconnecting the power source to prevent accidental activation or damage during cleaning․ Use a soft, slightly damp cloth – never submerge the keypad in water or use abrasive cleaners․ A mild soap solution can be applied to the cloth for stubborn dirt, but ensure thorough rinsing with a clean, damp cloth afterward․
Pay particular attention to the keys, removing any accumulated grime or debris․ Avoid spraying liquids directly onto the keypad; always apply to the cloth first․ For hard-to-reach areas, a soft-bristled brush can be gently used․ After cleaning, thoroughly dry the keypad with a clean, dry cloth before reconnecting the power․ Regular cleaning, ideally monthly or as needed based on environmental conditions, will keep your Mighty Mule keypad operating smoothly and reliably․
Environmental Considerations (Temperature, Moisture)
Optimal performance of your Mighty Mule keypad relies on suitable environmental conditions․ The keypad is designed to withstand typical outdoor temperatures, but extreme heat or cold can affect functionality․ Avoid prolonged exposure to temperatures outside the range of -20°F to 140°F (-29°C to 60°C)․
Moisture is a significant concern; while the keypad is weather-resistant, direct and continuous exposure to rain, snow, or humidity should be minimized․ Ensure proper sealing around the mounting location to prevent water ingress․ Avoid using the keypad during or immediately after heavy rainfall․ Condensation can also form during temperature fluctuations, potentially causing internal damage․ Regularly inspect the keypad for any signs of moisture and address any issues promptly to maintain reliable operation and prevent long-term problems․
Protecting Against Vandalism
Safeguarding your Mighty Mule keypad from vandalism is crucial for uninterrupted gate access․ Consider the keypad’s location; mounting it in a well-lit, visible area can deter potential vandals․ Utilizing a robust mounting bracket and tamper-resistant screws is highly recommended, making physical removal more difficult․
Adding a protective enclosure or security shield provides an additional layer of defense against impacts and deliberate damage․ Regularly inspect the keypad for any signs of tampering or attempted vandalism․ If possible, integrate the keypad with a security camera system to record activity and provide evidence in case of an incident․ Promptly repair any damage to maintain the keypad’s functionality and deter further attempts․ A well-maintained and secured keypad ensures long-term reliability․

Compatibility & System Integration
Seamless integration is key! This section explores compatibility with Mighty Mule operators and potential connections to broader security networks․
Mighty Mule Gate Operator Compatibility

Ensuring a Perfect Match: Mighty Mule keypads are specifically engineered for optimal performance when paired with Mighty Mule gate operator systems․ Compatibility extends across a wide range of models, including the popular 24V and 12V DC gate operators, as well as select AC models․ Before installation, always verify that your keypad’s voltage and wiring configuration align with your specific gate operator’s requirements․
Seamless Communication: The keypads utilize a secure radio frequency (RF) communication protocol to interact with the gate operator, minimizing interference and maximizing range․ This robust connection ensures reliable gate control, even from a distance․ Older models may require a compatibility module for optimal function․ Refer to the Mighty Mule website or contact customer support for a complete compatibility list and any necessary adapter information․ Proper pairing is crucial for secure operation․
Integration with Other Security Systems
Expanding Your Security Network: The Mighty Mule keypad can be integrated with existing home or business security systems to create a comprehensive security solution․ This often involves utilizing the keypad’s relay outputs to trigger alarms or activate other security devices upon authorized or unauthorized access attempts․
Compatibility Considerations: Integration typically requires professional installation and may necessitate the use of a compatible interface module․ Common integrations include connections to alarm panels, access control systems, and video surveillance systems․ Ensure that the security system supports dry contact inputs for seamless communication with the keypad․ Always consult with a qualified security professional to determine the best integration strategy for your specific needs and to avoid compatibility issues․ Proper configuration is vital for a unified security experience․
Remote Access Options (if applicable)
Controlling Access From Afar: Certain Mighty Mule keypad models offer remote access capabilities, typically through a compatible smartphone app or web portal․ This allows authorized users to manage access codes, monitor gate activity, and even operate the gate remotely, providing enhanced convenience and control․
Connectivity & Security: Remote access usually requires a stable internet connection and a compatible Mighty Mule system component, such as a gateway module․ Security is paramount; ensure the system utilizes robust encryption protocols to protect against unauthorized access․ Regularly update the app and firmware to benefit from the latest security patches․ Explore features like user activity logs and push notifications for real-time alerts regarding gate operation․ Professional installation is recommended for optimal setup and security․